Paperless Charting using MS Word
Warning: these instruction were written several years ago to work with MS Word 2003; they are somewhat dated
Bruce A. Stephenson, DDS
(Scroll WAY to the end of this page to see an addendum showing an example of our charting.)
In our office we use the auto-correct feature of Microsoft Word for “canned” charting notes. You can do the same thing with Open Office (which is free), but the directions below are specific for MS Word.
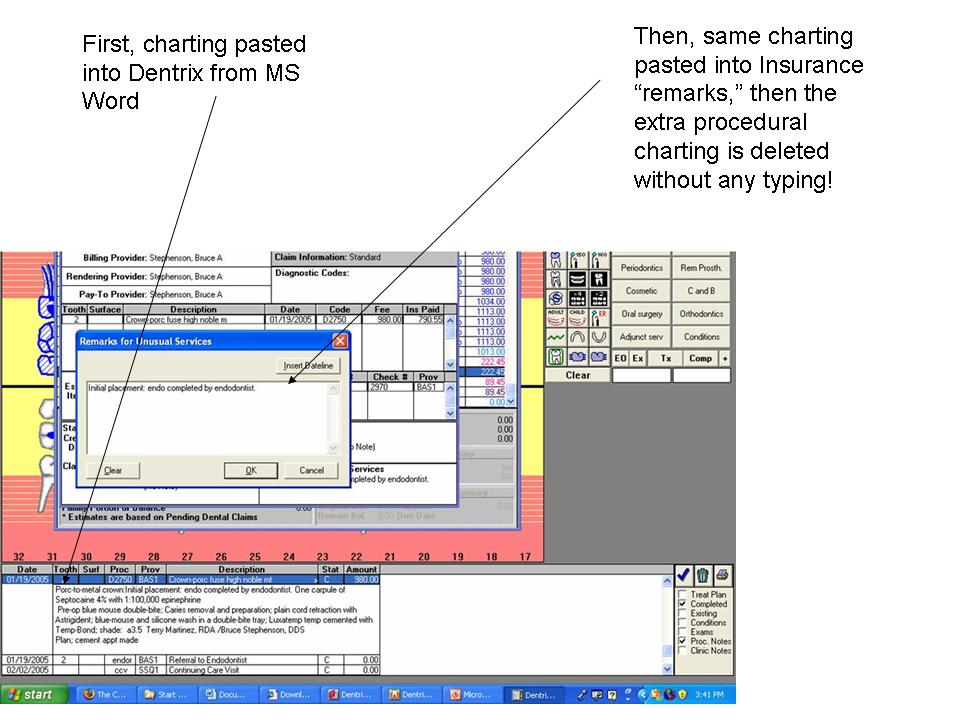
Our charting is usually done in the operatory by the chairsides. Using our MS Word "macro's, we chart the need (insurance documentation) for the treatment in the first lines of our charting, then the details of the procedures, local, etc. This is then pasted into Dentrix chart. We then immediately generate the insurance claim and copy the same entire note into the "remarks" section. Finally we delete everything in the pasted note in the remarks section except the first few lines covering the documentation for tx. Very fast, no typing, and the insurance company gets exactly the same documentation as we have in our clinical notes. We then choose the images we want to send with the claim (usually a digital pan). We use a double-tray closed bite impression for most crowns that sets in 1.5 minutes.
One of my chairsides can get all the charting done, insurance form generation done, images done and new gloves on before the impression is ready to remove from the mouth. If she does the lab slip also (a modified quick letter with more ms word automatic typing), it takes her another 30 seconds so I have to take the impression out of the mouth myself! Poor me! (no more raises until she gets a little faster!) By the time the patient leaves the operatory, all the charting is done, the insurance is billed and the next appointment is scheduled. When the patient gets to the front desk, my office manager just has to put down her People Magazine long enough to collect any money due. This is a really great illustration of how paperless / chartless dentistry is so much more efficient than a paper-based system!
Here is the step-by-step:
Prep; lavage with 70% isopropyl alcohol for 30 seconds; etch with 35% phosphoric acid for 20 seconds; rinse and dry; applied Gluma for 30 seconds and dry; apply Photobond; Starflow placed along gingival margin; remainder of prep filled with Z100; pulse cured

Large restoration with extensive recurrent caries; inadequate amount of tooth structure remaining to provide sufficient longevity for any restoration other than casting. Two carpules of citanest with Forte 4%; Pre-op blue mouse double-bite; Caries removal and preparation; plain cord retraction with Astrigident; blue-mouse and silicone wash in a double-bite tray; Luxatemp temp cemented with Temp-Bond; Bruce Stephenson, DDS Terry Martinez, RDA
Plan: cementation – appointment made
I have used different color fonts just for illustration to show the link between what I actually entered at the keyboard and what shows up in MS Word.
![]()
_________________________________________________________________________________________________________
An Example of Paperless Charting
Bruce Stephenson, DDS
Thursday, January 27, 2005
Here is the sample of some of our charting. You can see that all the charting is attached just to one procedure … in this case the crown … but it pertains to the entire visit.

Our lab slip which is done as a dentrix quick letter but filled out in ms word; one copy is printed and attached to the case, and the second “copy” is pasted in chart as you see. Any letter we send (to a pt or another dentist, etc) is handled the same one.
To me, the whole point of going “paperless” is because it is easier and more efficient than paper charts. This saves the office an incredible amount of time … thereby saving me a bunch of money!
(If you would like a copy of the Word Shortcuts Dr. Stephenson uses in his office, click here. You need MS Word to open this file)